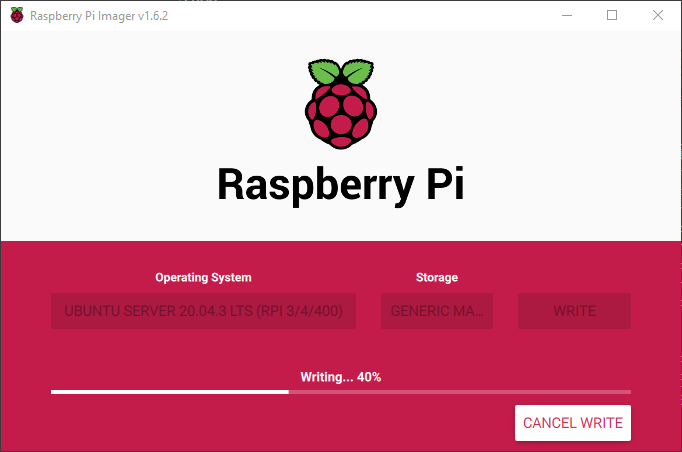
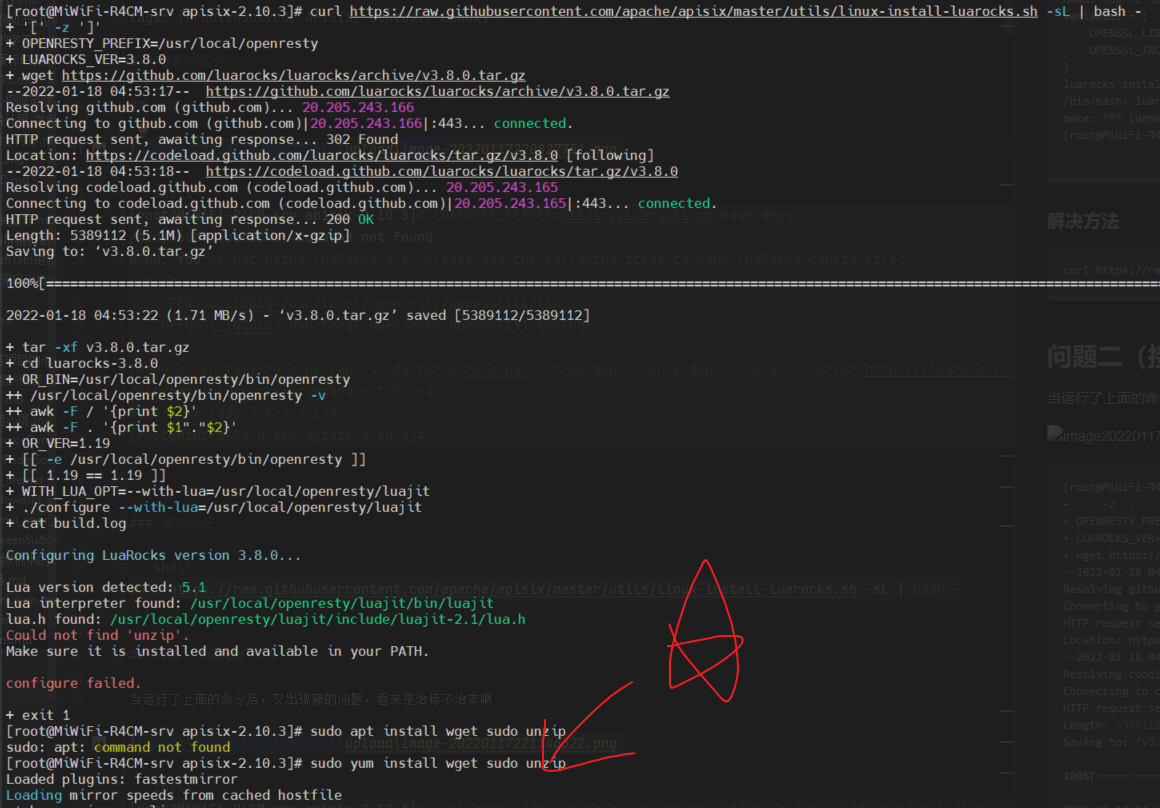
细节问题:没想到已经跑通测试的我,还是在新的开发机上跑测试框架遇到了问题。本次主要问题在于
一个安装包问题,所以说环境是真的无语,还是得设置到代理啊。我设置了git 的代理解决了问题,
详情方法,请参考 link ,我的主要疏忽在于,没注意端口,
因为之前实在 Windows 本上做开发的,用的是 v2ray,端口是 10808,没曾想就照着走错了,离谱啊。此处 mark 一下,需要注意。
然后还有一个点需要注意一下,make deps 和 LUAROCKS_SERVER=https://luarocks.cn make deps 可以混着用,over。
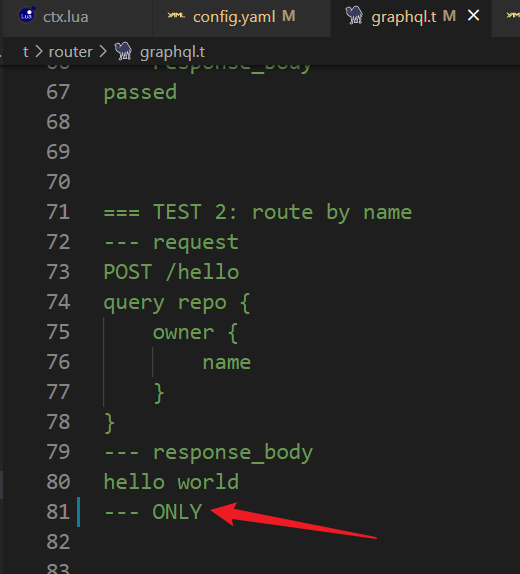
use whole request body to parse graphql will get parse error.
graphql request body is json , example :{"query":"query{getUser{name age}}","variables":null},
{"query":
    "query{
        getUser{
            name age
        }
    }",
    "variables":null
}
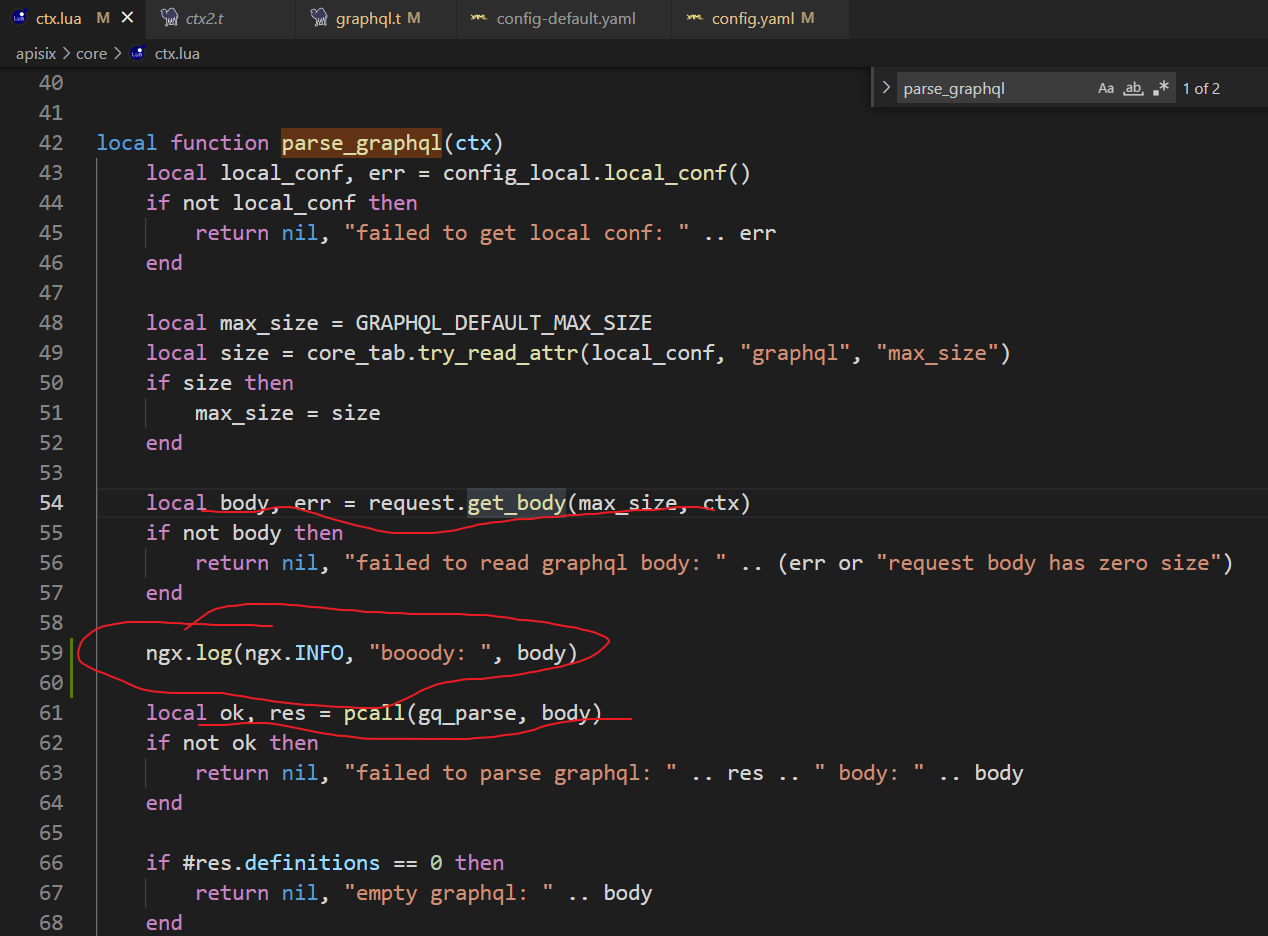
--
-- Licensed to the Apache Software Foundation (ASF) under one or more
-- contributor license agreements.  See the NOTICE file distributed with
-- this work for additional information regarding copyright ownership.
-- The ASF licenses this file to You under the Apache License, Version 2.0
-- (the "License"); you may not use this file except in compliance with
-- the License.  You may obtain a copy of the License at
--
--     http://www.apache.org/licenses/LICENSE-2.0
--
-- Unless required by applicable law or agreed to in writing, software
-- distributed under the License is distributed on an "AS IS" BASIS,
-- WITHOUT WARRANTIES OR CONDITIONS OF ANY KIND, either express or implied.
-- See the License for the specific language governing permissions and
-- limitations under the License.
--
local core_str     = require("apisix.core.string")
local core_tab     = require("apisix.core.table")
local request      = require("apisix.core.request")
local log          = require("apisix.core.log")
local config_local = require("apisix.core.config_local")
local tablepool    = require("tablepool")
local get_var      = require("resty.ngxvar").fetch
local get_request  = require("resty.ngxvar").request
local ck           = require "resty.cookie"
local gq_parse     = require("graphql").parse
local setmetatable = setmetatable
local sub_str      = string.sub
local ngx          = ngx
local ngx_var      = ngx.var
local re_gsub      = ngx.re.gsub
local ipairs       = ipairs
local type         = type
local error        = error
local pcall        = pcall


local _M = {version = 0.2}
local GRAPHQL_DEFAULT_MAX_SIZE = 1048576               -- 1MiB


local function parse_graphql(ctx)
    local local_conf, err = config_local.local_conf()
    if not local_conf then
        return nil, "failed to get local conf: " .. err
    end

    local max_size = GRAPHQL_DEFAULT_MAX_SIZE
    local size = core_tab.try_read_attr(local_conf, "graphql", "max_size")
    if size then
        max_size = size
    end

    local body, err = request.get_body(max_size, ctx)
    if not body then
        return nil, "failed to read graphql body: " .. err
    end

    local ok, res = pcall(gq_parse, body)
    if not ok then
        return nil, "failed to parse graphql: " .. res .. " body: " .. body
    end

    if #res.definitions == 0 then
        return nil, "empty graphql: " .. body
    end

    return res
end


local function get_parsed_graphql()
    local ctx = ngx.ctx.api_ctx
    if ctx._graphql then
        return ctx._graphql
    end

    local res, err = parse_graphql(ctx)
    if not res then
        log.error(err)
        ctx._graphql = {}
        return ctx._graphql
    end

    if #res.definitions > 1 then
        log.warn("Multiple operations are not supported.",
                    "Only the first one is handled")
    end

    local def = res.definitions[1]
    local fields = def.selectionSet.selections
    local root_fields = core_tab.new(#fields, 0)
    for i, f in ipairs(fields) do
        root_fields[i] = f.name.value
    end

    local name = ""
    if def.name and def.name.value then
        name = def.name.value
    end

    ctx._graphql = {
        name = name,
        operation = def.operation,
        root_fields = root_fields,
    }

    return ctx._graphql
end


do
    -- 获取特殊var的方法
    local var_methods = {
        method = ngx.req.get_method,
        -- ref: https://github.com/cloudflare/lua-resty-cookie
        cookie = function ()
            if ngx.var.http_cookie then
                return ck:new()
            end
        end
    }

    local no_cacheable_var_names = {
        -- var.args should not be cached as it can be changed via set_uri_args
        args = true,
        is_args = true,
    }

    local ngx_var_names = {
        upstream_scheme            = true,
        upstream_host              = true,
        upstream_upgrade           = true,
        upstream_connection        = true,
        upstream_uri               = true,

        upstream_mirror_host       = true,

        upstream_cache_zone        = true,
        upstream_cache_zone_info   = true,
        upstream_no_cache          = true,
        upstream_cache_key         = true,
        upstream_cache_bypass      = true,

        var_x_forwarded_proto = true,
    }

    local mt = {
        -- 重载 hash 元方法
        -- t 是 self
        __index = function(t, key)

            -- 若 cache table 存在直接返回
            local cached = t._cache[key]
            if cached ~= nil then
                return cached
            end

            if type(key) ~= "string" then
                error("invalid argument, expect string value", 2)
            end

            local val
            -- 如果是特殊类型, 使用特定方法获取
            local method = var_methods[key]
            if method then
                val = method()

            elseif core_str.has_prefix(key, "cookie_") then
                -- 通过 var_methods 访问到 resty.cookie
                local cookie = t.cookie
                if cookie then
                    local err
                    val, err = cookie:get(sub_str(key, 8))
                    if err then
                        log.warn("failed to fetch cookie value by key: ",
                                 key, " error: ", err)
                    end
                end

            elseif core_str.has_prefix(key, "arg_") then
                local arg_key = sub_str(key, 5)
                local args = request.get_uri_args()[arg_key]
                if args then
                    if type(args) == "table" then
                        val = args[1]
                    else
                        val = args
                    end
                end

            elseif core_str.has_prefix(key, "http_") then
                key = key:lower()
                key = re_gsub(key, "-", "_", "jo")
                -- 最终通过 ngx.var 获取
                val = get_var(key, t._request)

            elseif core_str.has_prefix(key, "graphql_") then
                -- trim the "graphql_" prefix
                key = sub_str(key, 9)
                val = get_parsed_graphql()[key]

            elseif key == "route_id" then
                val = ngx.ctx.api_ctx and ngx.ctx.api_ctx.route_id

            elseif key == "service_id" then
                val = ngx.ctx.api_ctx and ngx.ctx.api_ctx.service_id

            elseif key == "consumer_name" then
                val = ngx.ctx.api_ctx and ngx.ctx.api_ctx.consumer_name

            elseif key == "route_name" then
                val = ngx.ctx.api_ctx and ngx.ctx.api_ctx.route_name

            elseif key == "service_name" then
                val = ngx.ctx.api_ctx and ngx.ctx.api_ctx.service_name

            elseif key == "balancer_ip" then
                val = ngx.ctx.api_ctx and ngx.ctx.api_ctx.balancer_ip

            elseif key == "balancer_port" then
                val = ngx.ctx.api_ctx and ngx.ctx.api_ctx.balancer_port

            else
                val = get_var(key, t._request)
            end

            if val ~= nil and not no_cacheable_var_names[key] then
                t._cache[key] = val
            end

            return val
        end,

        __newindex = function(t, key, val)
            if ngx_var_names[key] then
                ngx_var[key] = val
            end

            -- log.info("key: ", key, " new val: ", val)
            t._cache[key] = val
        end,
    }

function _M.set_vars_meta(ctx)
    local var = tablepool.fetch("ctx_var", 0, 32)
    if not var._cache then
        var._cache = {}
    end

    var._request = get_request()
    setmetatable(var, mt)
    ctx.var = var
end

function _M.release_vars(ctx)
    if ctx.var == nil then
        return
    end

    core_tab.clear(ctx.var._cache)
    tablepool.release("ctx_var", ctx.var, true)
    ctx.var = nil
end

end -- do


return _M
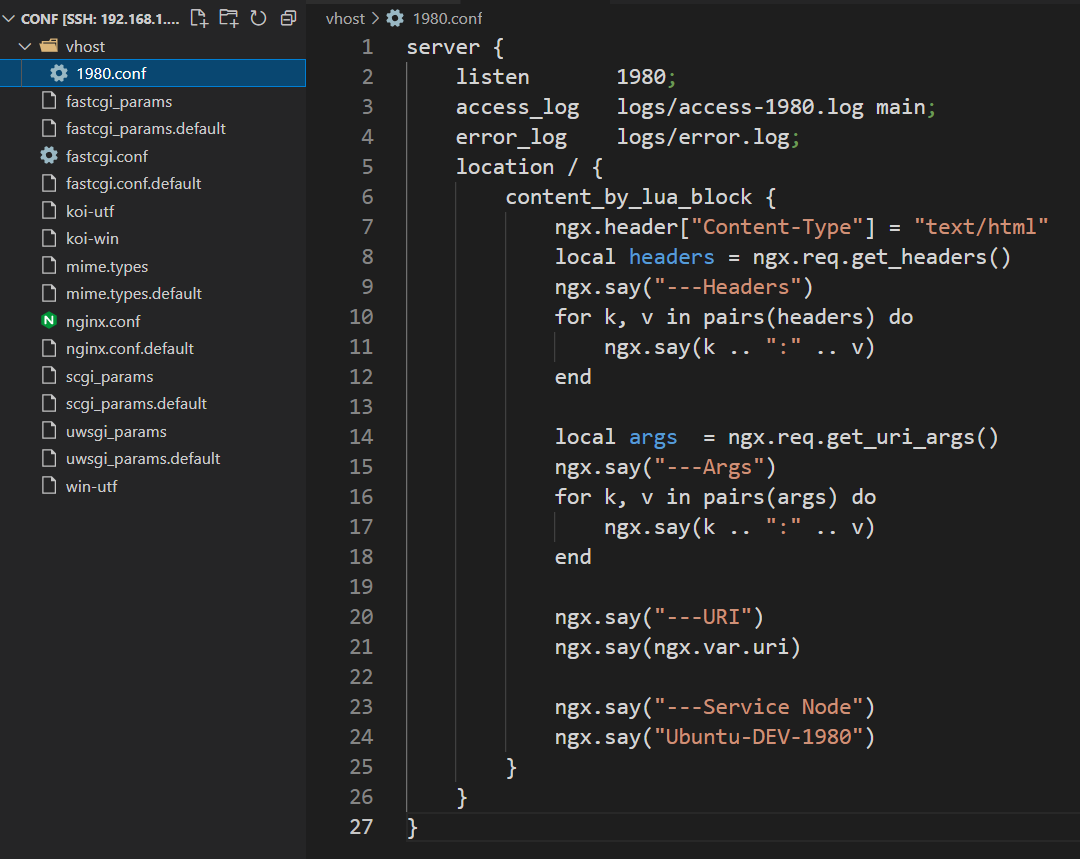
server {
    listen       1980;
    access_log   logs/access-1980.log main;
    error_log    logs/error.log;
    location / {
        content_by_lua_block {
            ngx.header["Content-Type"] = "text/html"
            local headers = ngx.req.get_headers()
            ngx.say("---Headers")
            for k, v in pairs(headers) do
                ngx.say(k .. ":" .. v)
            end

            local args  = ngx.req.get_uri_args()
            ngx.say("---Args")
            for k, v in pairs(args) do
                ngx.say(k .. ":" .. v)
            end

            ngx.say("---URI")
            ngx.say(ngx.var.uri)

            ngx.say("---Service Node")
            ngx.say("Ubuntu-DEV-1980")
        }
    }
}
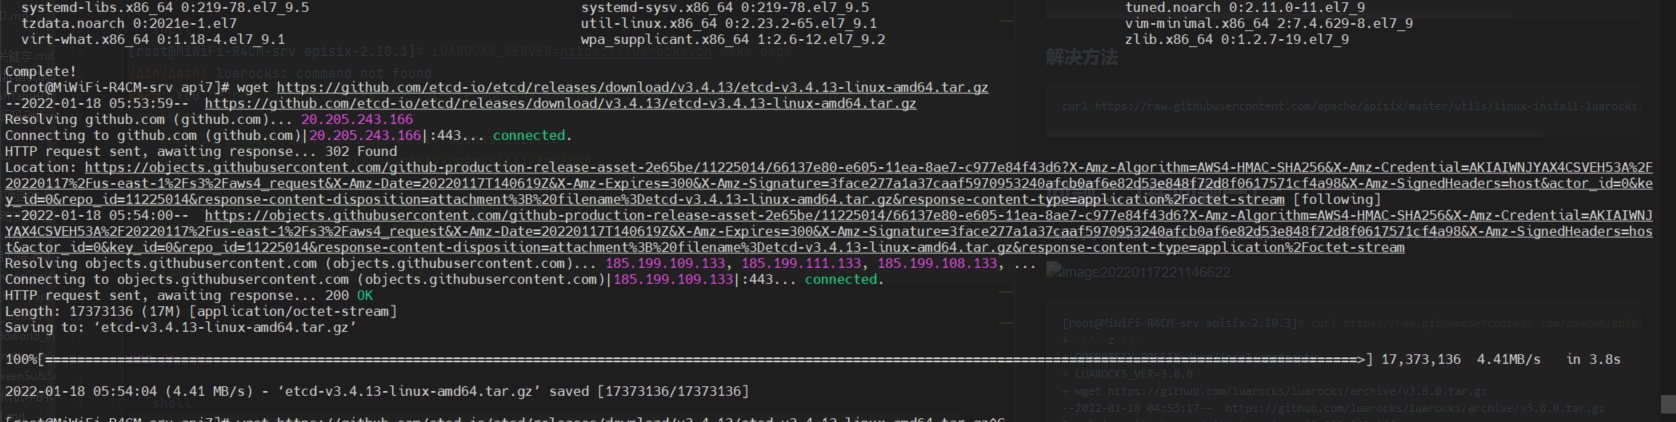
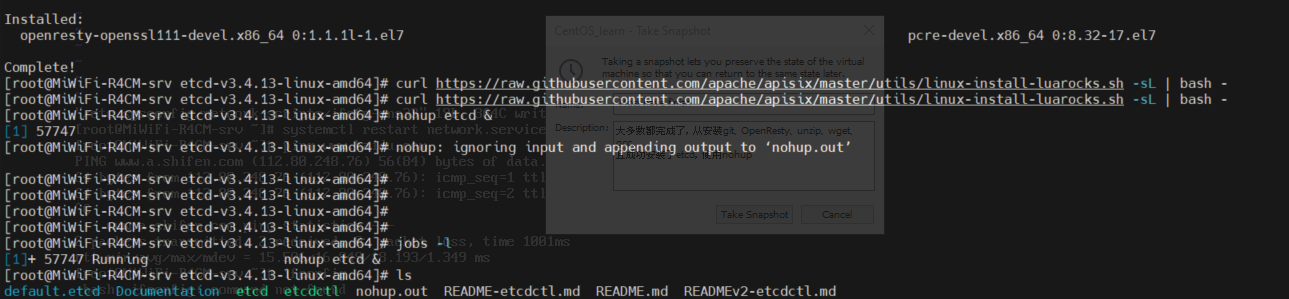
wget https://github.com/etcd-io/etcd/releases/download/v3.4.13/etcd-v3.4.13-linux-amd64.tar.gz tar -xvf etcd-v3.4.13-linux-amd64.tar.gz &&\ cd etcd-v3.4.13-linux-amd64 &&\ sudocp -a etcd etcdctl /usr/bin/
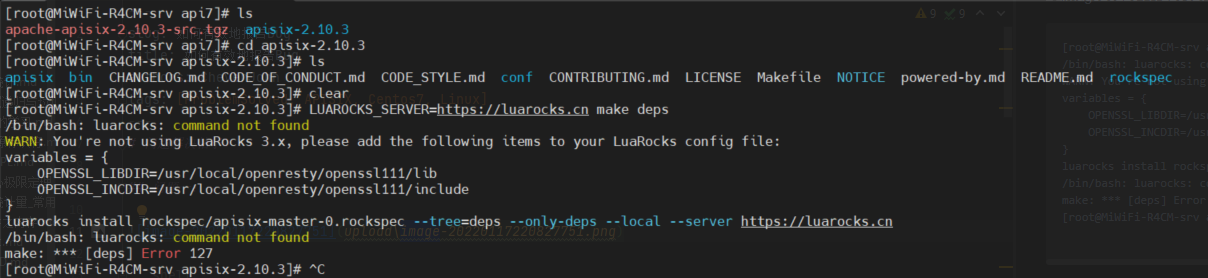
[root@MiWiFi-R4CM-srv apisix-2.10.3]# LUAROCKS_SERVER=https://luarocks.cn make deps /bin/bash: luarocks: command not found WARN: You're not using LuaRocks 3.x, please add the following items to your LuaRocks config file: variables ={ OPENSSL_LIBDIR=/usr/local/openresty/openssl111/lib OPENSSL_INCDIR=/usr/local/openresty/openssl111/include } luarocks install rockspec/apisix-master-0.rockspec --tree=deps --only-deps --local --server https://luarocks.cn /bin/bash: luarocks: command not found make: *** [deps] Error 127 [root@MiWiFi-R4CM-srv apisix-2.10.3]# ^C
[root@MiWiFi-R4CM-srv apisix-2.10.3]# LUAROCKS_SERVER=https://luarocks.cn make deps
爆出问题
分析问题:
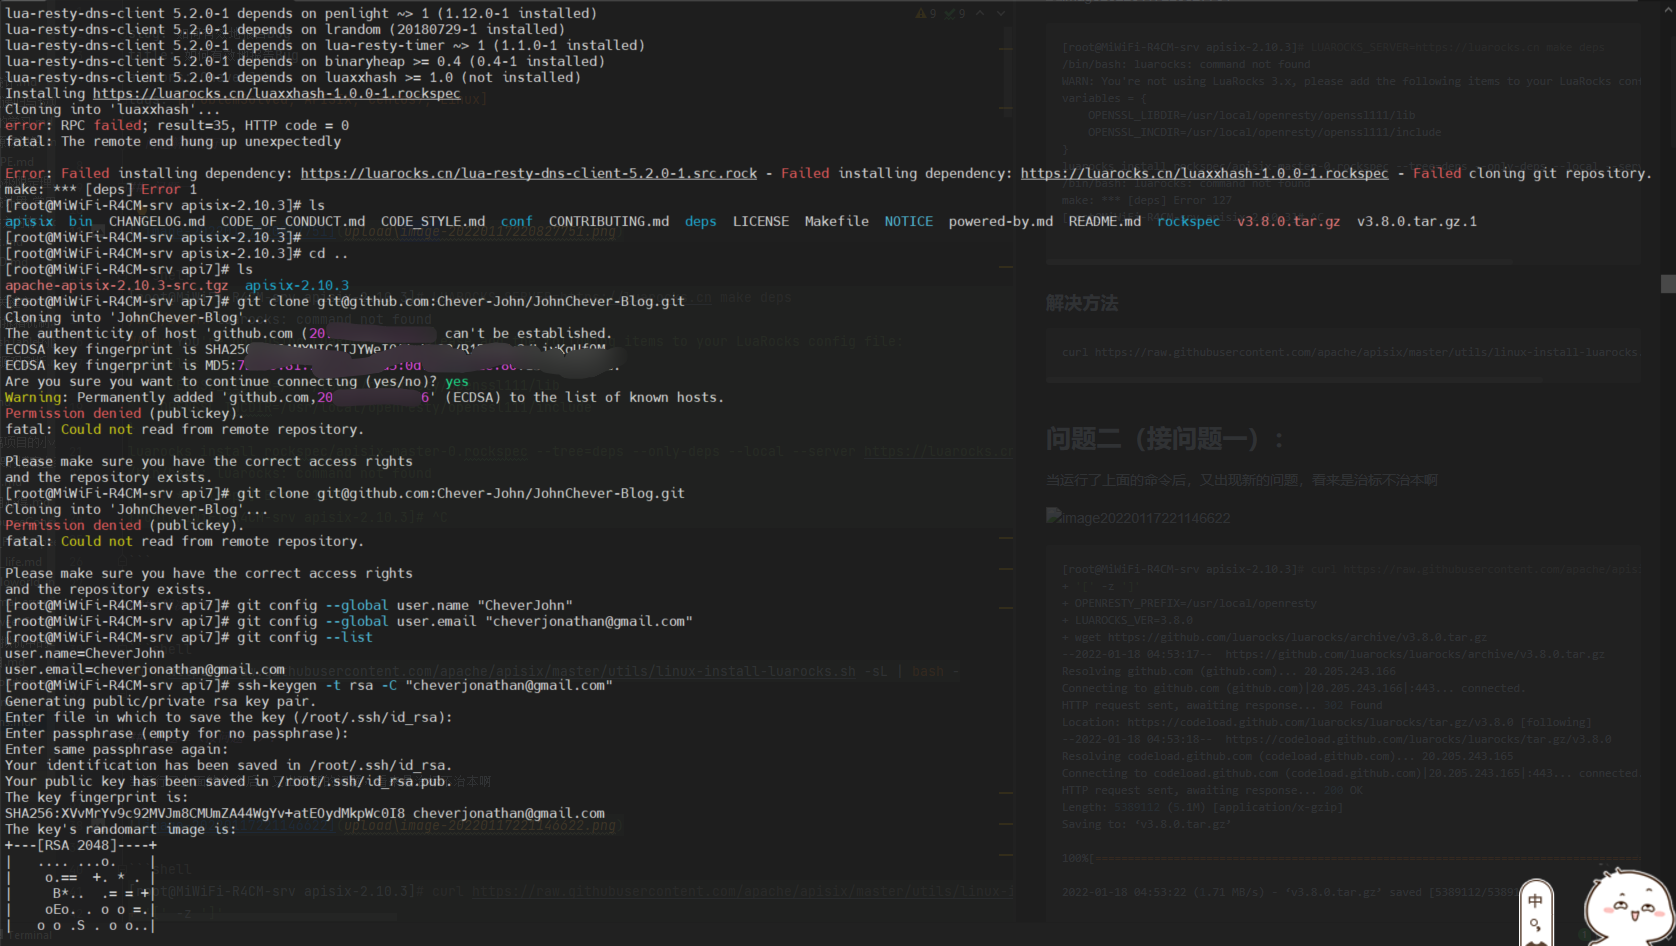
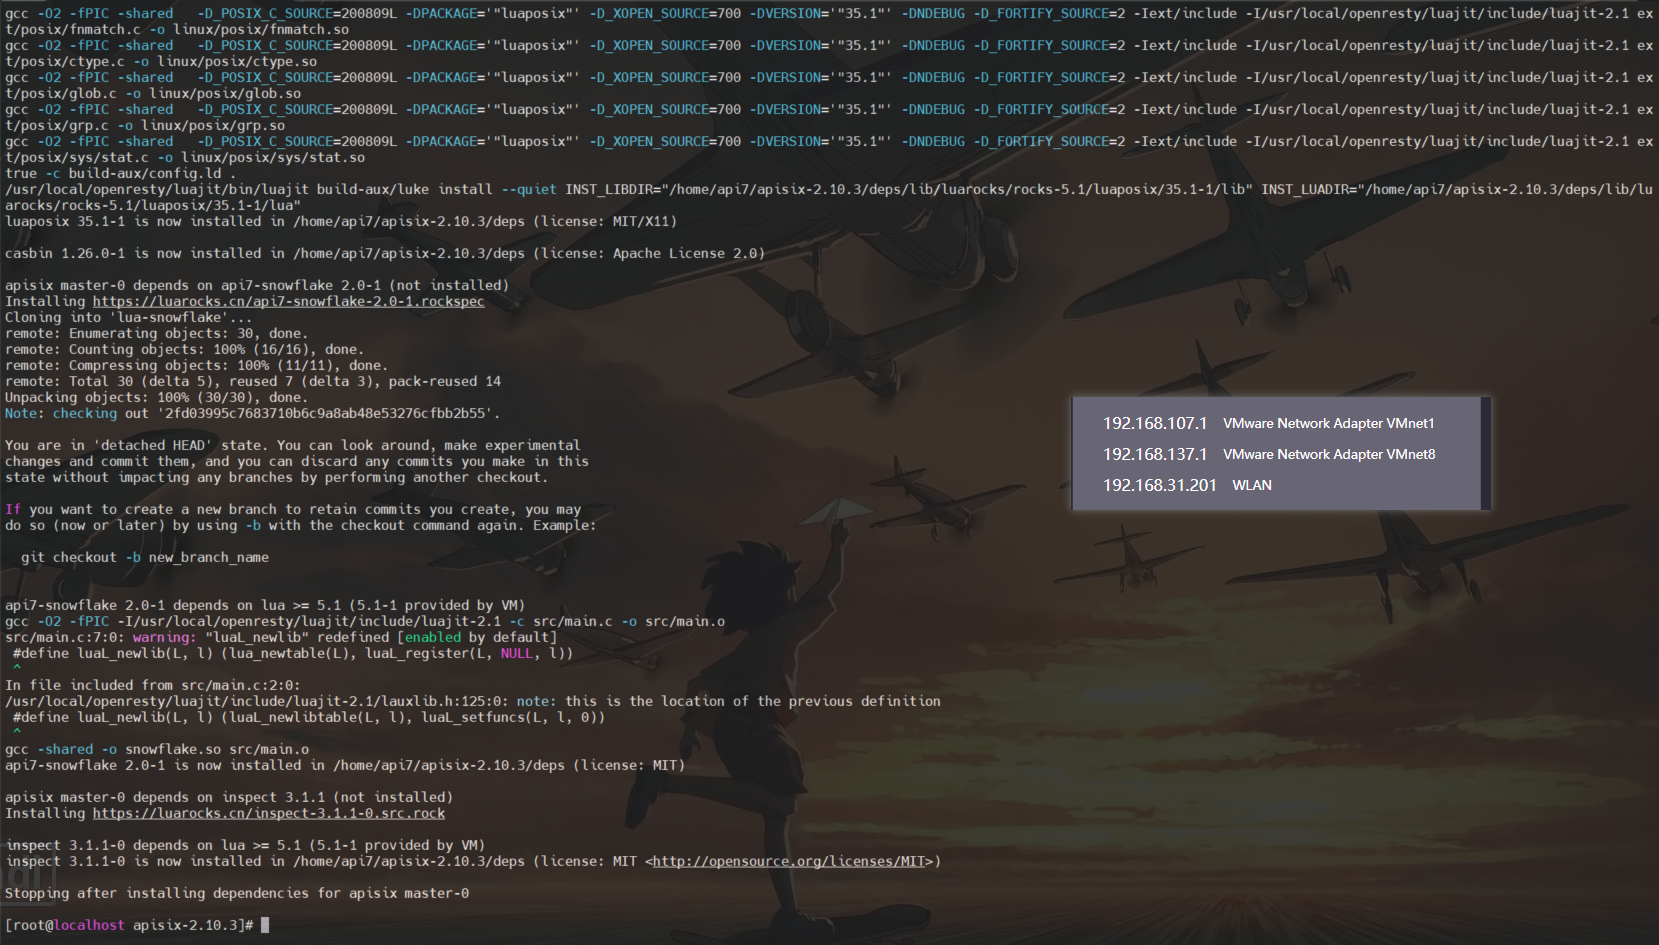
[root@MiWiFi-R4CM-srv apisix-2.10.3]# LUAROCKS_SERVER=https://luarocks.cn make deps ………………………………………………………………………………………………………………………………………………………………………… lua-resty-dns-client 5.2.0-1 depends on luaxxhash >=1.0(not installed) Installing https://luarocks.cn/luaxxhash-1.0.0-1.rockspec Error: Failed installing dependency: https://luarocks.cn/lua-resty-dns-client-5.2.0-1.src.rock - Failed installing dependency: https://luarocks.cn/luaxxhash-1.0.0-1.rockspec - 'git' program not found. Make sure Git is installed and is available in your PATH(or you may want to edit the 'variables.GIT' value infile'/root/.luarocks/config-5.1.lua') make: *** [deps] Error 1 [root@MiWiFi-R4CM-srv apisix-2.10.3]# yum install -y git
很明显就是没有安装配置好git嘛
lua-resty-dns-client 5.2.0-1 depends on lua >=5.1, <5.4(5.1-1 provided by VM) lua-resty-dns-client 5.2.0-1 depends on penlight ~>1(1.12.0-1 installed) lua-resty-dns-client 5.2.0-1 depends on lrandom (20180729-1 installed) lua-resty-dns-client 5.2.0-1 depends on lua-resty-timer ~>1(1.1.0-1 installed) lua-resty-dns-client 5.2.0-1 depends on binaryheap >=0.4(0.4-1 installed) lua-resty-dns-client 5.2.0-1 depends on luaxxhash >=1.0(not installed) Installing https://luarocks.cn/luaxxhash-1.0.0-1.rockspec Cloning into 'luaxxhash'... error: RPC failed;result=35, HTTP code =0 fatal: The remote end hung up unexpectedly Error: Failed installing dependency: https://luarocks.cn/lua-resty-dns-client-5.2.0-1.src.rock - Failed installing dependency: https://luarocks.cn/luaxxhash-1.0.0-1.rockspec - Failed cloning git repository. make: *** [deps] Error 1 [root@MiWiFi-R4CM-srv apisix-2.10.3]# ls apisix bin CHANGELOG.md CODE_OF_CONDUCT.md CODE_STYLE.md conf CONTRIBUTING.md deps LICENSE Makefile NOTICE powered-by.md README.md rockspec v3.8.0.tar.gz v3.8.0.tar.gz.1 [root@MiWiFi-R4CM-srv apisix-2.10.3]# [root@MiWiFi-R4CM-srv apisix-2.10.3]# cd .. [root@MiWiFi-R4CM-srv api7]# ls apache-apisix-2.10.3-src.tgz apisix-2.10.3 [root@MiWiFi-R4CM-srv api7]# git clone git@github.com:Chever-John/JohnChever-Blog.git Cloning into 'JohnChever-Blog'... The authenticity of host'github.com (20.205.243.166)' can't be established. ECDSA key fingerprint is SHA256:p2QAMXNIC1TJYWeIOttrVc98/R1BUFWu3/LiyKgUfQM. ECDSA key fingerprint is MD5:7b:99:81:1e:4c:91:a5:0d:5a:2e:2e:80:13:3f:24:ca. Are you sure you want to continue connecting (yes/no)? yes Warning: Permanently added 'github.com,20.205.243.166' (ECDSA) to the list of known hosts. Permission denied (publickey). fatal: Could not read from remote repository. Please make sure you have the correct access rights and the repository exists. [root@MiWiFi-R4CM-srv api7]# git clone git@github.com:Chever-John/JohnChever-Blog.git Cloning into 'JohnChever-Blog'... Permission denied (publickey). fatal: Could not read from remote repository. Please make sure you have the correct access rights and the repository exists. [root@MiWiFi-R4CM-srv api7]# git config --global user.name "CheverJohn" [root@MiWiFi-R4CM-srv api7]# git config --global user.email "cheverjonathan@gmail.com" [root@MiWiFi-R4CM-srv api7]# git config --list user.name=CheverJohn user.email=cheverjonathan@gmail.com [root@MiWiFi-R4CM-srv api7]# ssh-keygen -t rsa -C "cheverjonathan@gmail.com" Generating public/private rsa key pair. Enter file in which to save the key (/root/.ssh/id_rsa): Enter passphrase (empty for no passphrase): Enter same passphrase again: Your identification has been saved in /root/.ssh/id_rsa. Your public key has been saved in /root/.ssh/id_rsa.pub. The key fingerprint is: SHA256:XVvMrYv9c92MVJm8CMUmZA44WgYv+atEOydMkpWc0I8 cheverjonathan@gmail.com The key's randomart image is: +---[RSA 2048]----+ |.......o. | | o.== +. * .| | B*.. .== +| | oEo. . o o =.| | o o .S . o o..| |=.. +.o | | * o ..ooo| |.= .o=| |. +| +----[SHA256]-----+ [root@MiWiFi-R4CM-srv api7]# cat /root/.ssh cat: /root/.ssh: Is a directory [root@MiWiFi-R4CM-srv api7]# ls apache-apisix-2.10.3-src.tgz apisix-2.10.3 [root@MiWiFi-R4CM-srv api7]# cd /root/.ssh [root@MiWiFi-R4CM-srv .ssh]# ls id_rsa id_rsa.pub known_hosts [root@MiWiFi-R4CM-srv .ssh]# cat id_rsa.pub 接下来显示就是生成的ssh密钥了,将其复制到github上的ssh里即可
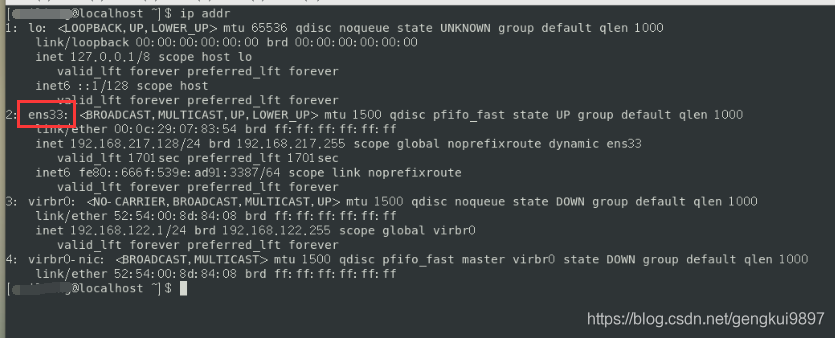
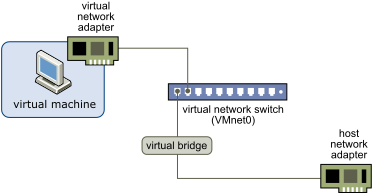
When you install Workstation Pro on a Windows or Linux host system, a bridged network (VMnet0) is set up for you. Bridged networking connects a virtual machine to a network by using the network adapter on the host system. If the host system is on a network, bridged networking is often the easiest way to give the virtual machine access to that network.
With bridged networking, the virtual network adapter in the virtual machine connects to a physical network adapter in the host system. The host network adapter enables the virtual machine to connect to the LAN that the host system uses. Bridged networking works with both wired and wireless host network adapters.
Bridged networking configures the virtual machine as a unique identity on the network, separate from and unrelated to the host system. The virtual machine is a full participant in the network. It has access to other machines on the network, and other machines on the network can contact it as if it were a physical computer on the network.
You can view and change the settings for bridged networking on the host system, determine which network adapters to use for bridged networking, and map specific host network adapters to specific virtual switches.
A virtual machine must have its own identity on a bridged network. For example, on a TCPIP network, the virtual machine needs its own IP address. Your network administrator can tell you whether IP addresses are available for virtual machines and which networking settings to use in the guest operating system.
When you install Workstation Pro on a Windows or Linux host system, a bridged network (VMnet0) is set up for you. If you install Workstation Pro on a host system that has multiple network adapters, you can configure multiple bridged networks.
By default, VMnet0 is set to use auto-bridging mode and is configured to bridge to all active network adapters on the host system. You can use the virtual network editor to change VMnet0 to bridge to one specific host network adapter, or restrict the host network adapters that VMnet0 auto-bridges to. The changes you make affect all virtual machines that use bridged networking on the host system.[了解更多内容]
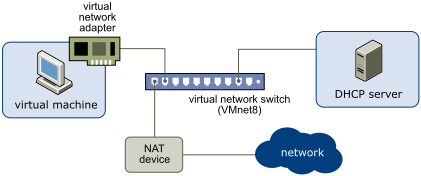
When you install Workstation Pro on a Windows or Linux host system, a NAT network (VMnet8) is set up for you. When you use the New Virtual Machine wizard to create a typical virtual machine, the wizard configures the virtual machine to use the default NAT network.
With NAT, a virtual machine does not have its own IP address on the external network. Instead, a separate private network is set up on the host system. In the default configuration, virtual machines get an address on this private network from the virtual DHCP server.
The virtual machine and the host system share a single network identity that is not visible on the external network. NAT works by translating the IP addresses of virtual machines in the private network to the IP address of the host system. When a virtual machine sends a request to access a network resource, it appears to the network resource as if the request is coming from the host system.
The host system has a virtual network adapter on the NAT network. This adapter enables the host system and virtual machines to communicate with each other. The NAT device passes network data between one or more virtual machines and the external network, identifies incoming data packets intended for each virtual machine, and sends them to the correct destination.
If you use NAT networking in a Windows virtual machine running on a Windows host system, you can use NetLogon to log in to a Windows domain from the virtual machine and access file shares that the WINS server knows.[了解更多内容]
If a virtual machine that uses NAT attempts to connect to a server that requires the client to use a source port below 1024, the NAT device must forward the request from a port below 1024. For security reasons, some servers accept connections only from source ports below 1024.[了解更多内容]
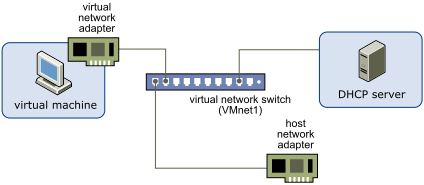
When you install Workstation Pro on a Windows or Linux host system, a host-only network (VMnet1) is set up for you. Host-only networking is useful if you need to set up an isolated virtual network. In a host-only network, the virtual machine and the host virtual network adapter are connected to a private Ethernet network. The network is completely contained within the host system.
The network connection between the virtual machine and the host system is provided by a virtual network adapter that is visible on the host operating system. The virtual DHCP server provides IP addresses on the host-only network.
In the default configuration, a virtual machine in a host-only network cannot connect to the Internet. If you install the proper routing or proxy software on the host system, you can establish a connection between the host virtual network adapter and a physical network adapter on the host system to connect the virtual machine to a Token Ring or other non-Ethernet network.
On a Windows host computer, you can use host-only networking in combination with the Internet Connection Sharing feature in Windows to allow a virtual machine to use the dial-up networking adapter or other connection to the Internet on the host system. See Microsoft documentation for information on configuring Internet Connection Sharing.
When you install Workstation Pro on a Windows or Linux host system, a host-only network (VMnet1) is set up for you. You might want to configure multiple host-only networks to manage network traffic between virtual machines in specific ways. [了解更多内容]
You can configure host-only networking for an existing virtual machine. You can connect a virtual network adapter to the default host-only network (VMnet1) or to a custom host-only network. If a virtual machine has two virtual network adapters, you can connect it to two host-only networks. [了解更多内容]
If you are setting up a complex test network that uses virtual machines, you might want to have two independent host-only networks with a router between them. [了解更多内容]
Each host-only network should be confined to the host system on which it is set up. Packets that virtual machines send on this network should not leak out to a physical network attached to the host system. Packet leakage can occur only if a machine actively forwards packets.[了解更多内容]
A host-only network has a network interface associated with it (vmnet1) that is marked up when the host operating system is booted. Routing server processes that operate on the host operating system automatically discover the host-only network and propagate information on how to reach the network, unless you explicitly configure them not to do so.[了解更多内容]
The virtual DHCP server in Workstation Pro cannot update a DNS server by using a Dynamic Domain Name Service (DDNS). For this reason, you should use DHCP to supply IP addresses as well as other information, such as the identity of a host running a name server and the nearest router or gateway. [了解更多内容]
“工作站专业版”中的虚拟DHCP服务器无法通过DDNS (Dynamic Domain Name Service)更新DNS服务器。由于这个原因,您应该使用DHCP来提供IP地址以及其他信息,例如运行名称服务器的主机的标识以及最近的路由器或网关。