
5 posts tagged with "GraphQL"

View All Tags

· One min read
CheverJohn

这次的排错过程,主要是由我的 mentor 主导的,这边也给出了我导师的 github 账号,有兴趣的可以去交流一下哦。

tail -f logs/error.log

首先 static/img/2022-02-08-记录一次排错/image-20220208223242984.png image-20220208231005934

image-20220208230949696

image-20220208230815850

image-20220208230709047

  1. 得到 etcd 中所有的路由信息
etcdctl get / --prefix --keys-only
  1. tail 日志信息
tail -f logs/error.log
  1. 删除 etcd 中所有的 APISIX 路由数据
etcdctl del /apisix/routes --prefix
  1. 这边也记录一下 etcd 的官方关闭命令,其实也可以参考其他进程类关闭的方法:
kill `pgrep etcd`

来自于 etcd 官方链接

· 2 min read
CheverJohn

本篇文章主要针对 APISIX 的插件开发,以及核心开发,配置相应的测试框架,并跑通。

首先我通过 git clone 将 APISIX 源码仓库 clone 到本地。

然后搭配另外安装的 etcd 和 OpenResty,将一些例子请求跑起来。

然后就开始我们主要的配置测试框架过程。这边对于 APISIX、OpenResty、NGINX 皆可用。

首先如果想要获取对测试框架的基本知识,请浏览此链接,这对接下来的很多操作都很有帮助。

然后还有一些基本的经验可以学习。

先配置

首先将 APISIX 加入到框架中去

export PERL5LIB=.:$PERL5LIB:/home/api7/dev_cj/apisix

然后配置OpenResty 中的 NGINX 的环境变量配置

export PATH=/usr/local/openresty/nginx/sbin:$PATH

小知识

--- ONLY

在测试案例中加入 --- ONLY or --- SKIP 可以仅测试一个案例,可以大大加快速度。

ONLY只做一个测试例子

--- SKIP

跳过这一个测试案例,其他都跑

小知识

这边有一个专属于 APISIX 的小知识,跑测试前要下载子模块(submoudle)。

git submodule update --init --recursive

如果你跑测试的时候遇到这样的报错: 缺依赖

只需要运行上面的命令即可

· 14 min read
CheverJohn

本篇博客,详细讲述一个 issues 的解决过程,享受解决问题的快乐吧:)

起源

当我浏览我关注的 Apache APISIX 社区的时候,发现了一个非常符合我的 issues。这是一个关于 GraphQL 的issues,正好我有关于 GraphQL 的了解,便想着接下这个 issues 以锻炼自己的能力叭。

接下来讲述发现的过程:

issue 详情

看到 issue (标题为 bug: ctx.lua#59 parse_graphql(ctx) #6266 ),我刚开始看 issues 的时候,还以为是这位老哥不会使用 APISIX ,居然在发送请求的时候漏掉 -X POST (没想到最后还是我格局小了)

首先看 issue 的描述

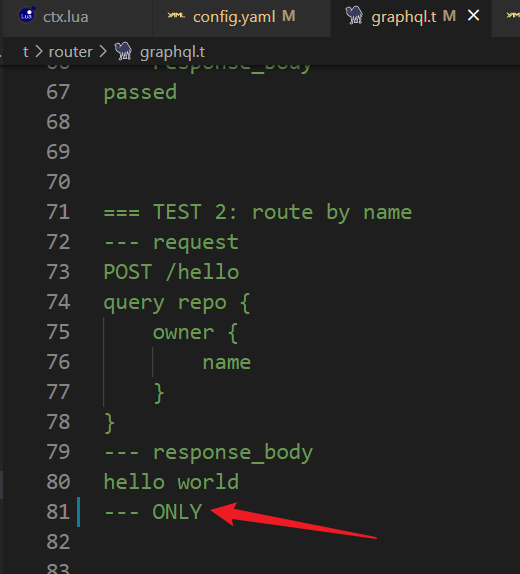
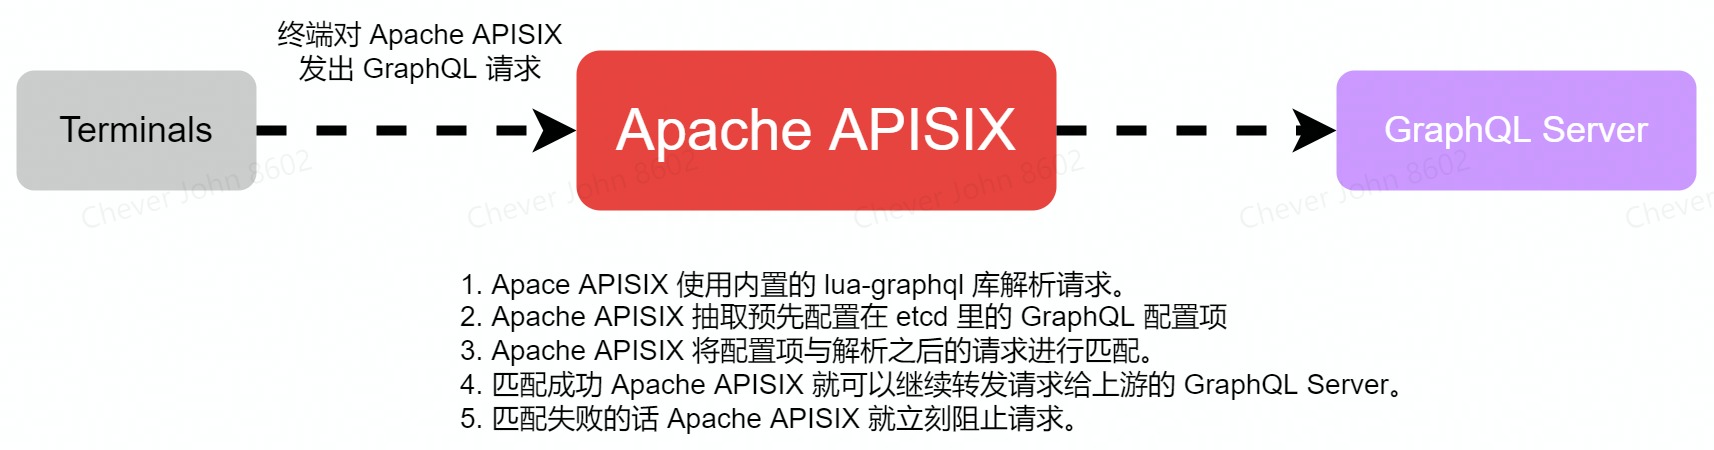
use whole request body to parse graphql will get parse error. graphql request body is json , example :{"query":"query{getUser{name age}}","variables":null},

{"query":
"query{
getUser{
name age
}
}",
"variables":null
}

not query{getUser{name age}}

query{
getUser{
name
age
}
}

我简单描述一下,这个问题就是说当他使用请求体为 json 的请求时,出现 parse error 的问题。

这边还是要抽自己一下,他都明确说了,没有用 query 的方式,我还在后边用我的 query 跟他解释,离谱,我该反省~

curl -X POST http://127.0.0.1:9080/graphql -d '
query getUser {
owner {
name
}
repo {
created
}
}'

他给出了自己的环境配置

Environment

  • apisix version (cmd: apisix version): apache/apisix:2.12.0-alpine
  • OS (cmd: uname -a): docker
  • OpenResty / Nginx version (cmd: nginx -V or openresty -V): null
  • etcd version, if have (cmd: run curl http://127.0.0.1:9090/v1/server_info to get the info from server-info API): bitnami/etcd:3.4.15
  • apisix-dashboard version, if have: apache/apisix-dashboard:2.10.1-alpine

然后他给出了自己的复现过程

Reproduce

  1. define graphql
query {
getUser:User
}

type User{
name:String
age:String
}
  1. add route
curl http://127.0.0.1:9080/apisix/admin/routes/1 -H 'X-API-KEY: edd1c9f034335f136f87ad84b625c8f1' -X PUT -i -d '
{
"methods": ["POST"],
"uri": "/graphql",
"vars": [
["graphql_operation", "==", "query"],
["graphql_name", "==", "getUser"]
],
"upstream": {
"type": "roundrobin",
"nodes": {
"127.0.0.1:1980": 1
}
}
}'
  1. perform graphql request by curl
curl 'http://127.0.0.1:9080/graphql' \
-H 'Content-Type: text/plain;charset=UTF-8' \
-H 'Accept: */*' \
--data-raw '{"query":"query getUser{getUser{name age}}","variables":null}' \
--compressed

上方请求化简

curl 'http://127.0.0.1:9080/graphql' \
-H 'Content-Type: text/plain;charset=UTF-8' \
-H 'Accept: */*' \
--data-raw '
{"query":"query getUser {
getUser {
name
age
}
}",
"variables":null
}' \
--compressed

Actual result

HTTP/1.1 404 Not Found Date: Tue, 08 Feb 2022 07:39:16 GMT Content-Type: text/plain; charset=utf-8 Transfer-Encoding: chunked Connection: keep-alive

{ "error_msg": "404 Route Not Found" }

Error log

2022/02/08 07:39:16 [error] 45#45: *1085159 [lua] ctx.lua:80: get_parsed_graphql(): failed to parse graphql: Syntax error near line 1 body:

Expected result

success

issue 提出者认为

一个正常的 graphql 请求应该是这样的:

curl 'https://api.mocki.io/v2/c4d7a195/graphql' \
-H 'authority: api.mocki.io' \
-H 'accept: */*' \
-H 'content-type: application/json' \
-H 'origin: https://api.mocki.io' \
--data-raw '{"operationName":"getUser","variables":{},"query":"query getUser {\n user(id: \"4dc70521-22bb-4396-b37a-4a927c66d43b\") {\n id\n email\n name\n }\n}\n"}' \
--compressed

会返回

{
"data": {
"user": {
"id": "Hello World",
"email": "Hello World",
"name": "Hello World"
}
}
}

而且

A standard GraphQL POST request should use the application/json content type, and include a JSON-encoded body of the following form:

{
"query": "...",
"operationName": "...",
"variables": { "myVariable": "someValue", ... }
}

see official graphql document, https://graphql.org/learn/serving-over-http/#post-request

and --data will perform request with POST method ,see curl document

对于 curl 工具的使用

$ curl --help
Usage: curl [options...] <url>
-d, --data <data> **HTTP POST data**
...

use -v to print verbose log

curl -v 'https://api.mocki.io/v2/c4d7a195/graphql' \
-H 'authority: api.mocki.io' \
-H 'accept: */*' \
-H 'content-type: application/json' \
-H 'origin: https://api.mocki.io' \
--data-raw '{"operationName":"getUser","variables":{},"query":"query getUser {\n user(id: \"4dc70521-22bb-4396-b37a-4a927c66d43b\") {\n id\n email\n name\n }\n}\n"}' \
--compressed

issue 提出者原话:

it will print something like this > POST /v2/c4d7a195/graphql HTTP/2, thought i'm not use -X POST

sorry, I'm try to discuss about how APISIX deal with graphql request. it seems that the mock GraphQL data of APISIX is not a standard GraphQL request.

得出结论: mock GraphQL data of APISIX is not a standard GraphQL request.

评估需求

看过这个 issue 之后,思考了 APISIX 中的 GraphQL 到底是什么。或许 APISIX 支持的是假的 GraphQL?思考明白之后才能动手做。

之前应该是只做了这个:If the "application/graphql" Content-Type header is present, treat the HTTP POST body contents as the GraphQL query string.

curl -v -H "Content-Type: application/graphql" -d "{ hello }"  "localhost:3000/graphql" 

需要指定 content-type 了

所以我对于这个 issue 的结论就是:需要 fix 三部分

  1. 解决 POST JSON的问题,让 APISIX 支持 JSON 格式的 POST;
  2. 支持 GET 。

其实根据这篇文档

一个标准的 GraphQL POST 请求就应该使用 application/json content type, 然后包括 json 格式的body在里边。

但对于目前的 GraphQL 在 APISIX 中的应用来讲,是可以通过 "application/graphql" Content-Type 的形式绕过的。参考文档中的这句:

If the "application/graphql" Content-Type header is present, treat the HTTP POST body contents as the GraphQL query string.

重点:点睛之笔

https://graphql.org/learn/serving-over-http/ 参考官方的文档,实际上 APISIX 现在处理的场景是

If the "application/graphql" Content-Type header is present, treat the HTTP POST body contents as the GraphQL query string.

APISIX 暂时只能够实现 GraphQL query 的功能。

我们需要 json 格式的功能 最好还要加上 “GET” 的功能。

可参考的 GraphQL 官方文档

https://graphql.org/learn/serving-over-http/#post-request

https://graphql.org/learn/serving-over-http/#post-request

评估工作情况

第一次评估

我认为我需要修改 graphql-lua 库中的 parse.lua

curl 'http://127.0.0.1:9080/graphql' \
-H 'Content-Type: text/plain;charset=UTF-8' \
-H 'Accept: */*' \
-d '{"query":"query getUser{getUser{name age}}","variables":null}' \
--compressed

源码分析

找到 GraphQL 在 APISIX 中的代码,主要有关系的只有apisix/core/ctx.lua 中有相关代码。其实 APISIX 依靠的

--
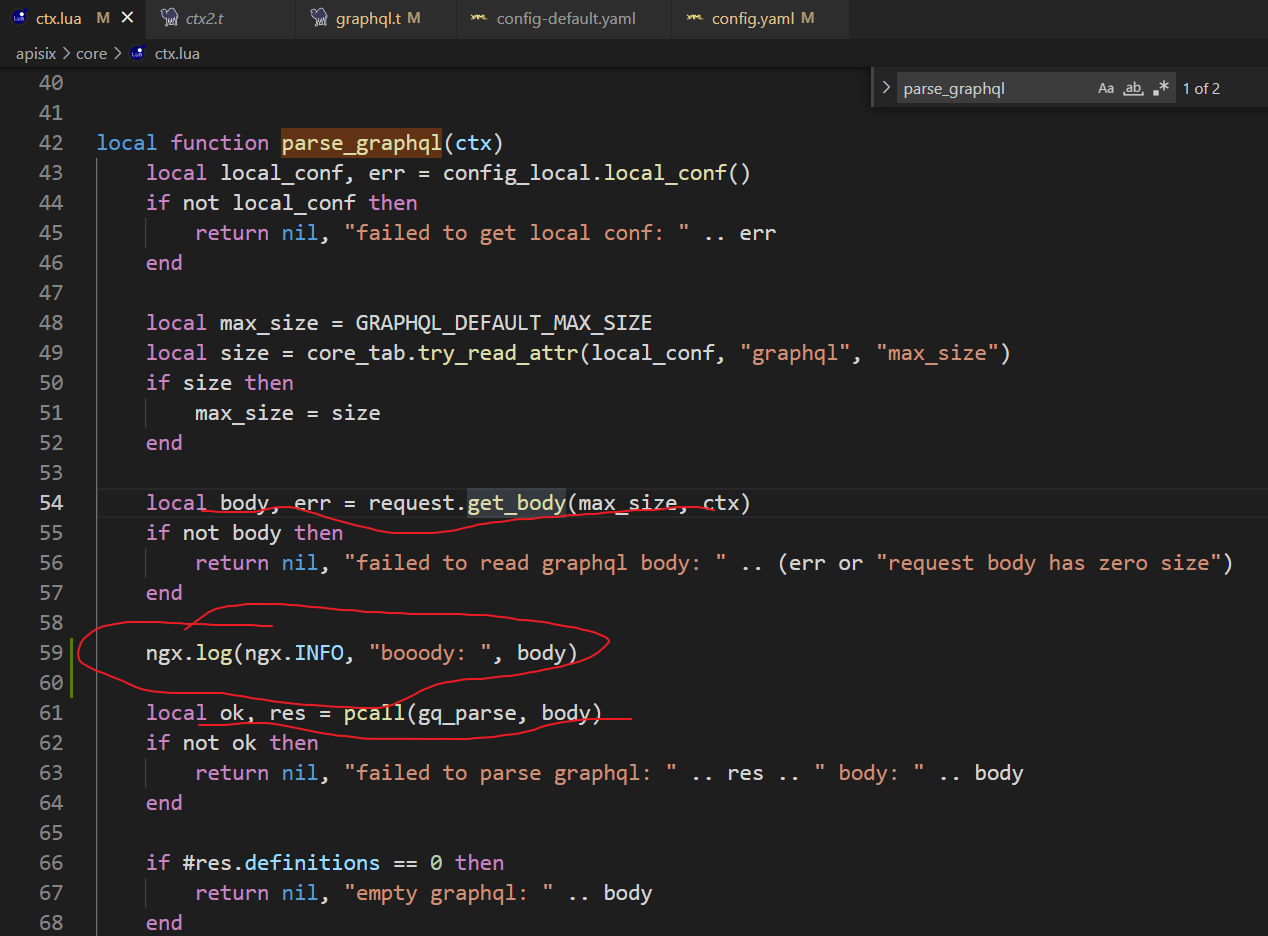
-- Licensed to the Apache Software Foundation (ASF) under one or more
-- contributor license agreements. See the NOTICE file distributed with
-- this work for additional information regarding copyright ownership.
-- The ASF licenses this file to You under the Apache License, Version 2.0
-- (the "License"); you may not use this file except in compliance with
-- the License. You may obtain a copy of the License at
--
-- http://www.apache.org/licenses/LICENSE-2.0
--
-- Unless required by applicable law or agreed to in writing, software
-- distributed under the License is distributed on an "AS IS" BASIS,
-- WITHOUT WARRANTIES OR CONDITIONS OF ANY KIND, either express or implied.
-- See the License for the specific language governing permissions and
-- limitations under the License.
--
local core_str = require("apisix.core.string")
local core_tab = require("apisix.core.table")
local request = require("apisix.core.request")
local log = require("apisix.core.log")
local config_local = require("apisix.core.config_local")
local tablepool = require("tablepool")
local get_var = require("resty.ngxvar").fetch
local get_request = require("resty.ngxvar").request
local ck = require "resty.cookie"
local gq_parse = require("graphql").parse
local setmetatable = setmetatable
local sub_str = string.sub
local ngx = ngx
local ngx_var = ngx.var
local re_gsub = ngx.re.gsub
local ipairs = ipairs
local type = type
local error = error
local pcall = pcall


local _M = {version = 0.2}
local GRAPHQL_DEFAULT_MAX_SIZE = 1048576 -- 1MiB


local function parse_graphql(ctx)
local local_conf, err = config_local.local_conf()
if not local_conf then
return nil, "failed to get local conf: " .. err
end

local max_size = GRAPHQL_DEFAULT_MAX_SIZE
local size = core_tab.try_read_attr(local_conf, "graphql", "max_size")
if size then
max_size = size
end

local body, err = request.get_body(max_size, ctx)
if not body then
return nil, "failed to read graphql body: " .. err
end

local ok, res = pcall(gq_parse, body)
if not ok then
return nil, "failed to parse graphql: " .. res .. " body: " .. body
end

if #res.definitions == 0 then
return nil, "empty graphql: " .. body
end

return res
end


local function get_parsed_graphql()
local ctx = ngx.ctx.api_ctx
if ctx._graphql then
return ctx._graphql
end

local res, err = parse_graphql(ctx)
if not res then
log.error(err)
ctx._graphql = {}
return ctx._graphql
end

if #res.definitions > 1 then
log.warn("Multiple operations are not supported.",
"Only the first one is handled")
end

local def = res.definitions[1]
local fields = def.selectionSet.selections
local root_fields = core_tab.new(#fields, 0)
for i, f in ipairs(fields) do
root_fields[i] = f.name.value
end

local name = ""
if def.name and def.name.value then
name = def.name.value
end

ctx._graphql = {
name = name,
operation = def.operation,
root_fields = root_fields,
}

return ctx._graphql
end


do
-- 获取特殊var的方法
local var_methods = {
method = ngx.req.get_method,
-- ref: https://github.com/cloudflare/lua-resty-cookie
cookie = function ()
if ngx.var.http_cookie then
return ck:new()
end
end
}

local no_cacheable_var_names = {
-- var.args should not be cached as it can be changed via set_uri_args
args = true,
is_args = true,
}

local ngx_var_names = {
upstream_scheme = true,
upstream_host = true,
upstream_upgrade = true,
upstream_connection = true,
upstream_uri = true,

upstream_mirror_host = true,

upstream_cache_zone = true,
upstream_cache_zone_info = true,
upstream_no_cache = true,
upstream_cache_key = true,
upstream_cache_bypass = true,

var_x_forwarded_proto = true,
}

local mt = {
-- 重载 hash 元方法
-- t 是 self
__index = function(t, key)

-- 若 cache table 存在直接返回
local cached = t._cache[key]
if cached ~= nil then
return cached
end

if type(key) ~= "string" then
error("invalid argument, expect string value", 2)
end

local val
-- 如果是特殊类型, 使用特定方法获取
local method = var_methods[key]
if method then
val = method()

elseif core_str.has_prefix(key, "cookie_") then
-- 通过 var_methods 访问到 resty.cookie
local cookie = t.cookie
if cookie then
local err
val, err = cookie:get(sub_str(key, 8))
if err then
log.warn("failed to fetch cookie value by key: ",
key, " error: ", err)
end
end

elseif core_str.has_prefix(key, "arg_") then
local arg_key = sub_str(key, 5)
local args = request.get_uri_args()[arg_key]
if args then
if type(args) == "table" then
val = args[1]
else
val = args
end
end

elseif core_str.has_prefix(key, "http_") then
key = key:lower()
key = re_gsub(key, "-", "_", "jo")
-- 最终通过 ngx.var 获取
val = get_var(key, t._request)

elseif core_str.has_prefix(key, "graphql_") then
-- trim the "graphql_" prefix
key = sub_str(key, 9)
val = get_parsed_graphql()[key]

elseif key == "route_id" then
val = ngx.ctx.api_ctx and ngx.ctx.api_ctx.route_id

elseif key == "service_id" then
val = ngx.ctx.api_ctx and ngx.ctx.api_ctx.service_id

elseif key == "consumer_name" then
val = ngx.ctx.api_ctx and ngx.ctx.api_ctx.consumer_name

elseif key == "route_name" then
val = ngx.ctx.api_ctx and ngx.ctx.api_ctx.route_name

elseif key == "service_name" then
val = ngx.ctx.api_ctx and ngx.ctx.api_ctx.service_name

elseif key == "balancer_ip" then
val = ngx.ctx.api_ctx and ngx.ctx.api_ctx.balancer_ip

elseif key == "balancer_port" then
val = ngx.ctx.api_ctx and ngx.ctx.api_ctx.balancer_port

else
val = get_var(key, t._request)
end

if val ~= nil and not no_cacheable_var_names[key] then
t._cache[key] = val
end

return val
end,

__newindex = function(t, key, val)
if ngx_var_names[key] then
ngx_var[key] = val
end

-- log.info("key: ", key, " new val: ", val)
t._cache[key] = val
end,
}

function _M.set_vars_meta(ctx)
local var = tablepool.fetch("ctx_var", 0, 32)
if not var._cache then
var._cache = {}
end

var._request = get_request()
setmetatable(var, mt)
ctx.var = var
end

function _M.release_vars(ctx)
if ctx.var == nil then
return
end

core_tab.clear(ctx.var._cache)
tablepool.release("ctx_var", ctx.var, true)
ctx.var = nil
end

end -- do


return _M

简单理一下函数框架

  • parse_graphql(ctx)
  • get_parsed_graphql()
  • do
    • var_methods
    • no_cacheable_var_names
    • ngx_var_names
    • mt
      • __index = function(t, key)
      • __newindex = function(t, key, val)
  • _M.set_vars_meta
  • _M.release_vars

然后中有一部分代码可以从 APISIX 的官方一个源码文档里得到学习。

地址为:请求生命周期

开始工作

我的第一版计划

  1. 向上游提交 json 格式的 PR
    1. 上游 PR 通过后,再进行 APISIX 的 issue 修复。
  2. APISIX 中只要对上游的函数进行使用,并输出报错结果就行。

大佬思路

来自APISIX PMC zexuan

大概意思就是,把 json 在APISIX 里解码成 query 字段,然后再将其query 喂给 graphql-lua。

我们并不需要支持 operationName、variable这些功能。

这个思路贼简单,那我为啥想不到呢?

轻微反思,是因为有点“眼高手低”处理实际问题的能力待加强。慢慢学习吧

有个调试问题没解决好,离谱,得加速了。

2022年2月11日的工作

  1. 找到需要更改的代码范围,将 graphql-lua 中的 parse.lua 代码理解清楚。
  2. ctx.lua 代码理解清楚。
  3. 确定思路

2022年2月14日的工作

  1. 完成测试框架的搭建

2022年2月15日的工作

  1. 成功跑通测试框架
  2. 开始正式开发,将问题锁定在具体的部分

问题解决需要在这里添加代码 需要添加代码的地方

很明显,当我从终端扫入一个 body ,它的内容可能是这样的。

2022/02/15 15:31:09 [info] 338683#338683: *77846 [lua] ctx.lua:59: parse_graphql(): booody: query getRepo {owner {name}repo {created}}, client: 127.0.0.1, server: _, request: "POST /graphql HTTP/1.1", host: "127.0.0.1:9080"

这对照了这样的请求:

curl -H 'content-type: application/graphql' -X POST http://127.0.0.1:9080/graphql -d 'query getRepo {owner {name}repo {created}}'

也可以是这样的:

2022/02/15 15:32:55 [info] 338682#338682: *84824 [lua] ctx.lua:59: parse_graphql(): booody: {"query":"query getUser{getUser{name age}}","variables":null}, client: 127.0.0.1, server: _, request: "POST /graphql HTTP/1.1", host: "127.0.0.1:9080"

这对照了这样的请求:

curl 'http://127.0.0.1:9080/graphql' \
-H 'Content-Type: application/json' \
-H 'Accept: */*' \
--data-raw '{"query":"query getUser{getUser{name age}}","variables":null}' \
--compressed

当然,第一个请求就是目前 APISIX 能够处理的 query 格式的 graphql 语句,第二个请求是目前 APISIX 不能够处理的 json 格式的 graphql 语句。

而我需要做的事情,就是把 json 格式转换为 query 格式,既然确认了,就开始做,寻找 lua 转换格式的方法。

· 8 min read
CheverJohn

本篇博客主要记录了我在使用 GraphQL 和 Apache APISIX 搭配过程中遇到的很多问题。纯属个人产出,有不对的地方还望指出。

基础命令

路由规则配置

# basic Apache APISIX config

curl http://127.0.0.1:9080/apisix/admin/routes/11 -H 'X-API-KEY: edd1c9f034335f136f87ad84b625c8f1' -X PUT -i -d '
{
"methods": ["POST"],
"uri": "/graphql",
"vars": [
["graphql_operation", "==", "query"],
["graphql_name", "==", "getRepo"],
["graphql_root_fields", "has", "owner"]
],
"upstream": {
"type": "roundrobin",
"nodes": {
"127.0.0.1:1980": 1
}
}
}'

反馈

一般在我之前的OpenResty中正常配置好1980服务器后,我配置APISIX路由正确之后会返回如下的信息

HTTP/1.1 200 OK
Date: Fri, 04 Feb 2022 22:00:03 GMT
Content-Type: application/json
Transfer-Encoding: chunked
Connection: keep-alive
Server: APISIX/2.10.3
Access-Control-Allow-Origin: *
Access-Control-Allow-Credentials: true
Access-Control-Expose-Headers: *
Access-Control-Max-Age: 3600

{"action":"set","node":{"value":{"update_time":1644012003,"create_time":1642620298,"methods":["POST"],"uri":"\/graphql","priority":0,"upstream":{"hash_on":"vars","scheme":"http","type":"roundrobin","nodes":{"127.0.0.1:1980":1},"pass_host":"pass"},"vars":[["graphql_operation","==","query"],["graphql_name","==","getRepo"],["graphql_root_fields","has","owner"]],"id":"11","status":1},"key":"\/apisix\/routes\/11"}}

简单请求

# basic request

curl -H 'content-type: application/graphql' -X POST http://127.0.0.1:9080/graphql -d '
query getRepo {
owner {
name
}
repo {
created
}
}'

反馈

当APISIX路由配置正确之后,请求一个基础请求

---Headers
x-real-ip:127.0.0.1
host:127.0.0.1:9080
x-forwarded-proto:http
x-forwarded-host:127.0.0.1
x-forwarded-port:9080
content-length:82
content-type:application/x-www-form-urlencoded
accept:*/*
user-agent:curl/7.29.0
x-forwarded-for:127.0.0.1
---Args
---URI
/graphql
---Service Node
Centos-port: 1980

进阶操作

感谢大佬时刻

这边感谢一下我泽轩大佬,谢谢他给我提出的宝贵意见。非常感谢!

体现 roundrobin 均衡策略

简单记一下逻辑,其实就是不断配置APISIX的路由规则

这边 upstream 里配置了分别架设在 OpenResty 上端口为 1980 和 1981 的两个 node

curl http://127.0.0.1:9080/apisix/admin/routes/11 -H 'X-API-KEY: edd1c9f034335f136f87ad84b625c8f1' -X PUT -i -d '
{
"methods": ["POST"],
"uri": "/graphql",
"vars": [
["graphql_operation", "==", "query"],
["graphql_name", "==", "getRepo"],
["graphql_root_fields", "has", "owner"]
],
"upstream": {
"type": "roundrobin",
"nodes": {
"127.0.0.1:1980": 1,
"127.0.0.1:1981": 1
}
}
}'

两个服务器的权重都设置为 1,一个等级,这里边 2 的权重大于 1。

然后分别发出请求的话,会按照顺序,1 > 2 > 1 > 2 > 1......的顺序得到 upstream 服务器的响应。

根据 graphql_name 匹配 upstream 服务器

错误示范

这一串是给第一个 upstream 服务器配置 graphql_name 为getRepo111

curl http://127.0.0.1:9080/apisix/admin/routes/11 -H 'X-API-KEY: edd1c9f034335f136f87ad84b625c8f1' -X PUT -i -d '
{
"methods": ["POST"],
"uri": "/graphql",
"vars": [
["graphql_operation", "==", "query"],
["graphql_name", "==", "getRepo111"],
["graphql_root_fields", "has", "owner"]
],
"upstream": {
"type": "roundrobin",
"nodes": {
"127.0.0.1:1980": 1
}
}
}'

第二个 upstream 服务器配置 graphql_name 为 getRepo222

curl http://127.0.0.1:9080/apisix/admin/routes/11 -H 'X-API-KEY: edd1c9f034335f136f87ad84b625c8f1' -X PUT -i -d '
{
"methods": ["POST"],
"uri": "/graphql",
"vars": [
["graphql_operation", "==", "query"],
["graphql_name", "==", "getRepo222"],
["graphql_root_fields", "has", "owner"]
],
"upstream": {
"type": "roundrobin",
"nodes": {
"127.0.0.1:1981": 1
}
}
}'

然后我们可以根据不同的 graphql query 来进行不同的匹配,即泽轩大佬说的

泽轩:Apache APISIX 还可以针对不同的 graphql_operation 进行不同的权限校验、针对不同的 graphql_name 转发到不同的 upstream。

开始 query

curl -H 'content-type: application/graphql' -i -X POST http://127.0.0.1:9080/graphql -d '
query getRepo111 {
owner {
name
}
repo {
created
}
}'

上面的query 转发到了1980 端口的 graphql server上

curl -H 'content-type: application/graphql' -i -X POST http://127.0.0.1:9080/graphql -d '
query getRepo222 {
owner {
name
}
repo {
created
}
}'

上面的 query 转发到了 1981 端口的 graphql server 上

就是这样,先简单做一下,明天再写详细一点。

这边可能对APISIX的 upstream 配置有点问题,所以暂停一下。

如果你这样设置,会遇到一个很明显的问题,后边的配置会覆盖掉前面的配置。

主要原因是 upstream 应该分组!接下来开始正式的工作

成功示范

对第一个 upstream 服务器的配置

首先创建一个上游 upstream 对象:

curl http://127.0.0.1:9080/apisix/admin/upstreams/1 -H 'X-API-KEY: edd1c9f034335f136f87ad84b625c8f1' -X PUT -d '
{
"type": "chash",
"key": "remote_addr",
"nodes": {
"127.0.0.1:1980": 1
}
}'

上游 upstream 对象创建后,均可以被具体 Route 或者 Service 引用,例如:

curl http://127.0.0.1:9080/apisix/admin/routes/1 -H 'X-API-KEY: edd1c9f034335f136f87ad84b625c8f1' -X PUT -i -d '
{
"methods": ["POST"],
"uri": "/graphql",
"vars": [
["graphql_operation", "==", "query"],
["graphql_name", "==", "getRepo111"],
["graphql_root_fields", "has", "owner"]
],
"upstream_id": "1"
}'

这里边我稍微解释一下,其中 curl http://127.0.0.1:9080/apisix/admin/routes/1 之后最后的 1,我认为就是 "upstream_id": "1"。因为从源码中解析 curl 请求的那个函数来看,就应该是这样的,如果有错误,可以来找我哈。

然后进行最后的正式请求:

curl -H 'content-type: application/graphql' -i -X POST http://127.0.0.1:9080/graphql -d '
query getRepo111 {
owner {
name
}
repo {
created
}
}'

得到正确的响应:

HTTP/1.1 200 OK
Content-Type: text/html; charset=utf-8
Transfer-Encoding: chunked
Connection: keep-alive
Date: Mon, 07 Feb 2022 22:57:24 GMT
Server: APISIX/2.10.3

---Headers
x-forwarded-port:9080
content-length:85
user-agent:curl/7.29.0
accept:*/*
content-type:application/x-www-form-urlencoded
host:127.0.0.1:9080
x-real-ip:127.0.0.1
x-forwarded-for:127.0.0.1
x-forwarded-proto:http
x-forwarded-host:127.0.0.1
---Args
---URI
/graphql111
---Service Node
Centos-port: 1980
John Chever's 1980 port is working......

完成第一个 upstream 上游服务器的配置了。

对第二个 upstream 服务器的配置

首先创建一个上游 upstream 对象:

curl http://127.0.0.1:9080/apisix/admin/upstreams/2 -H 'X-API-KEY: edd1c9f034335f136f87ad84b625c8f1' -X PUT -d '
{
"type": "chash",
"key": "remote_addr",
"nodes": {
"127.0.0.1:1981": 1
}
}'

上游 upstream 对象创建后,均可以被具体 Route 或者 Service 引用,例如:

curl http://127.0.0.1:9080/apisix/admin/routes/2 -H 'X-API-KEY: edd1c9f034335f136f87ad84b625c8f1' -X PUT -i -d '
{
"methods": ["POST"],
"uri": "/graphql",
"vars": [
["graphql_operation", "==", "query"],
["graphql_name", "==", "getRepo222"],
["graphql_root_fields", "has", "owner"]
],
"upstream_id": 2
}'

然后进行最后的正式请求:

curl -H 'content-type: application/graphql' -i -X POST http://127.0.0.1:9080/graphql -d '
query getRepo222 {
owner {
name
}
repo {
created
}
}'

得到正确的响应:

HTTP/1.1 200 OK
Content-Type: text/html; charset=utf-8
Transfer-Encoding: chunked
Connection: keep-alive
Date: Mon, 07 Feb 2022 23:04:44 GMT
Server: APISIX/2.10.3

---Headers
x-forwarded-port:9080
content-length:85
user-agent:curl/7.29.0
accept:*/*
content-type:application/x-www-form-urlencoded
host:127.0.0.1:9080
x-real-ip:127.0.0.1
x-forwarded-for:127.0.0.1
x-forwarded-proto:http
x-forwarded-host:127.0.0.1
---Args
---URI
/graphql222
---Service Node
Centos-port: 1981
John Chever's 1981 port is working......
小结

这样配置好,就可以根据不同的 graphql_name 来匹配不同的上游 upstream 啦。

根据 graphql_operation 进行不同的权限校验

首先配置好上游对象实例

curl http://192.168.1.200:9080/apisix/admin/routes/11 -H 'X-API-KEY: edd1c9f034335f136f87ad84b625c8f1' -X PUT -d '
{
"methods": ["POST"],
"uri": "/hello",
"vars": [
["graphql_operation", "==", "mutation"],
["graphql_name", "==", "repo"]
],
"upstream": {
"nodes": {
"192.168.1.200:1982": 1
},
"type": "roundrobin"
}
}'

然后发送请求以验证配置:

curl -i -X POST http://127.0.0.1:9080/hello -d '
mutation repo($ep: Episode!, $review: ReviewInput!) {
createReview(episode: $ep, review: $review) {
stars
commentary
}
}'

返回响应:

HTTP/1.1 200 OK
Content-Type: text/html; charset=utf-8
Transfer-Encoding: chunked
Connection: keep-alive
Date: Tue, 08 Feb 2022 22:05:51 GMT
Server: APISIX/2.10.3

---Headers
content-type:application/x-www-form-urlencoded
host:127.0.0.1:9080
x-real-ip:127.0.0.1
x-forwarded-for:127.0.0.1
x-forwarded-proto:http
x-forwarded-host:127.0.0.1
x-forwarded-port:9080
content-length:133
user-agent:curl/7.29.0
accept:*/*
---Args
---URI
/hello
---Service Node
Centos-port: 1982
John Chever's 1982 port is working......

自此实现了 Apache APISIX 针对不同的 graphql_operation 进行不同的权限校验、针对不同的 graphql_name 转发到不同的 upstream。

· 4 min read
CheverJohn

明天就是新春佳节了,已经鸽了两天的博客了,不能再继续下去咯!!! 然后祝大家新春快乐哈!

本次博客记录的是我使用 Apache APISIX 中的 GraphQL 特性时,遇到的新手级尴尬问题,淦!主要还是基础网络工具不会用。文章主要围绕两个点:一是 curl 命令工具的使用总结,二是 OpenResty 建立测试服务器的方法(以后还是要单独开张帖子,把 OpenResty,也可以说是 NGINX 的奇淫巧技都梳理一遍)

好吧又得鸽一天,看春晚去咯!:)

春节过完咯,开始肝!

教训妹妹的一晚!

完成文章的抽象部分内容 > 实操部分内容

前言

正如引言中所讲的,本篇博文主要是为了记录我使用 Apache APISIX 的 GraphQL 特性的过程。其中获得了一些对 Apache APISIX,亦或者说是 OpenResty,亦或者说是 NGINX 的最新感悟。首先我先以一张图缕清我所要做的事情的逻辑吧。

GraphQL流量在Apache_APISIX里的轨迹

当然上图这一层面还是太保守了,如果我们有多个 GraphQL Server 呢?其实 Apache APISIX 还具备根据搜索项的参数更精细化的匹配 GraphQL Server (多亏泽轩大佬跟我讲了)。那我们换一个场景。

根据三个参数更加精细化

graphql_operation
graphql_name
graphql_root_fields

逻辑图如下

GraphQL流量在Apache_APISIX里的轨迹_三个参数实现更精细化操作

以上是抽象层面的逻辑图,

部署配置

这一篇你可以搭配这两篇博客来看:

问题解决:跑通 GraphQL》: 这一篇介绍了我第一次跑通的情形,里边有我在虚拟机中的Centos7中实操的记录。

Support GraphQL In APISIX》: 主要讲了 GraphQL 在 APISIX 里的地位是什么样子的。

基础命令_graphql在APISIX中的应用

部署配置的架构图应如下所示:

GraphQL在centos中的具体部署方案

这边我们依靠了 OpenResty 搭建了两台 GraphQL Server 上游(Upstream)服务器。并使用命令配置 Apache APISIX的路由匹配规则。这样我们接下来发出 GraphQL 请求的时候,便可以有上游服务器进行响应了。