
首先讲一下为啥我要做一个 yubikey,为了帅啊!
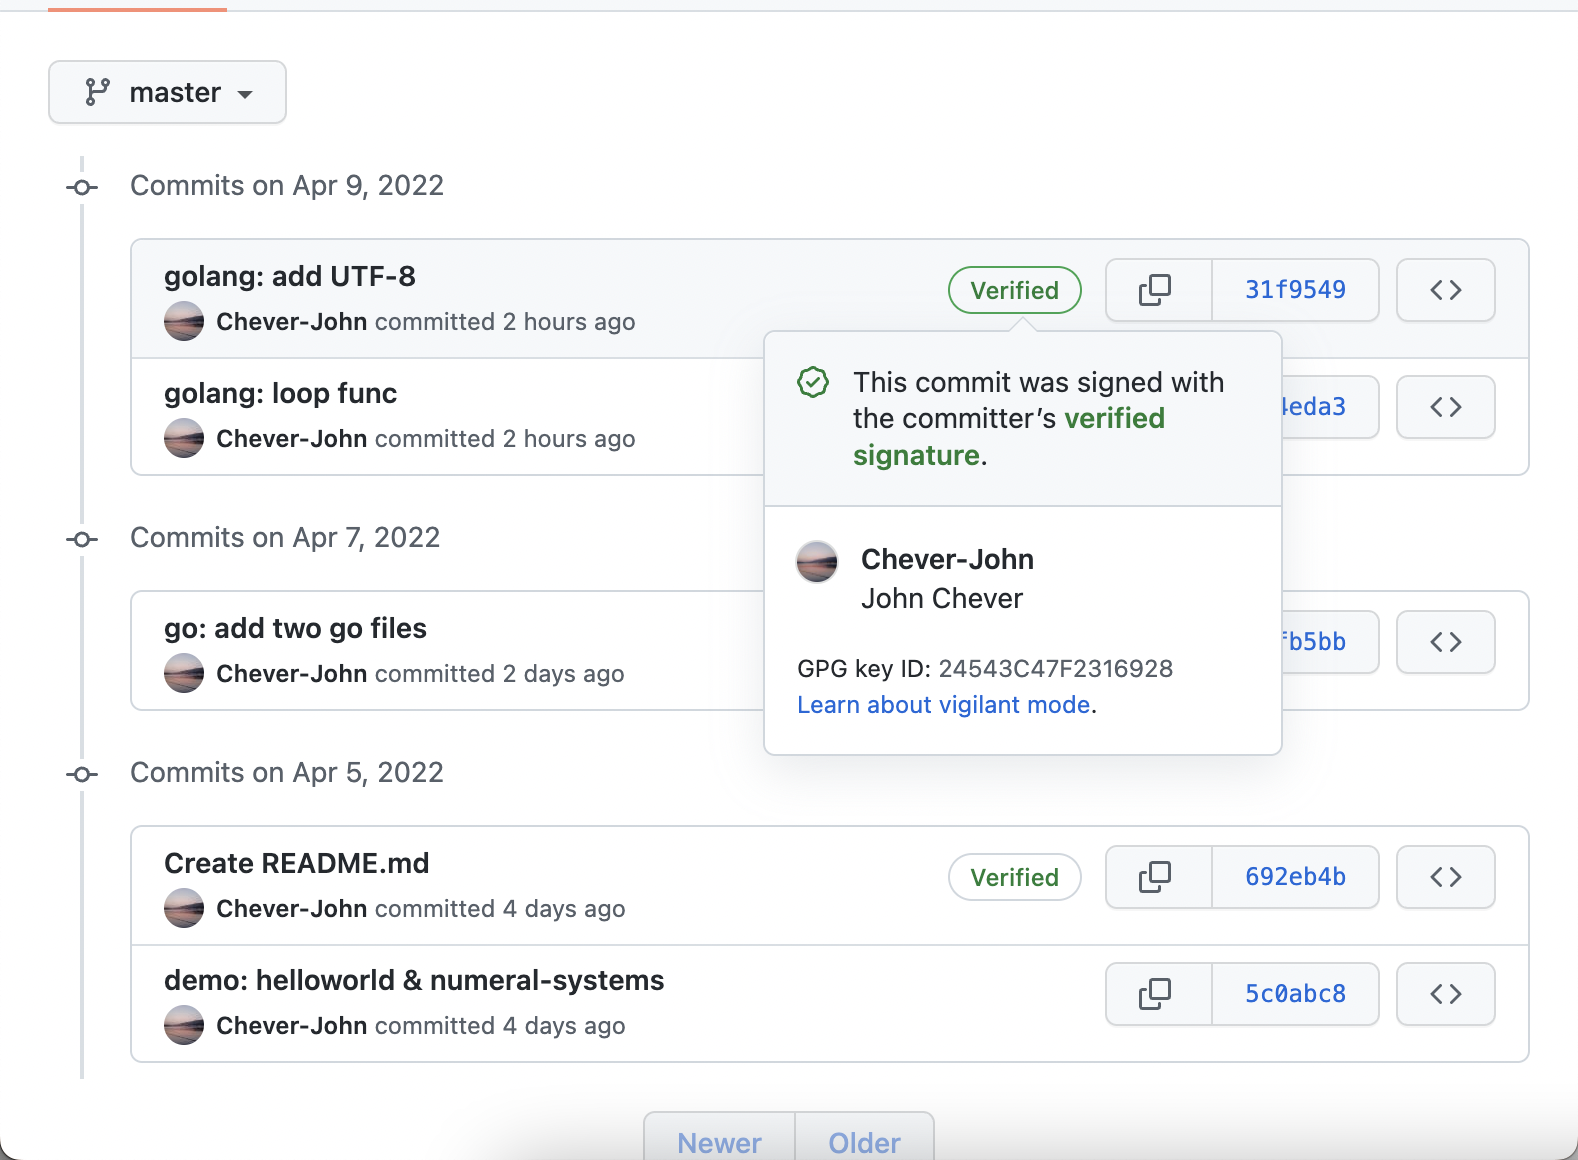
人活一世,哪能不帅一点呢?想想当你在提交你的 commit 的时候,掏出你的 yubikey(一款硬件加解密器)的时候,然后快速地在你的终端里输入一些命令(如下),然后你就可以在你的 GitHub 上看到一条 verified 的 commit,贼拉帅,如下:
科普引导
首先上一篇“约伊兹的萌狼乡手札 约伊兹的萌狼乡手札”大佬的一篇科普博客。从我们为什么需要密码技术,到实践上手一个gpg 加解密配置。讲得还算是很清楚啦!
然后是yubikey 的官网,重置密码一类的全在这里头,我这两天遇到的坑也大多可以从这边找到解决方法。yubikey's website,里边还有很多优秀的实践操作。可以学习!
还有这个开源的 gpg 软件,里边的文档也可以参考哈。 GnuPG。
最重要的链接
本篇博客主要实践是按照 GitHub 上这个项目的指导完成的。这篇文章其实和今天的方案也不太符合,因为他是需要两枚 yubikey 的最佳实践!当然因为我穷啦,只配拥有一枚 yubikey。等下次再买一枚,构建主密钥保护子密钥的系统。 https://github.com/YubicoLabs/sign-git-commits-yubikey 再将链接放清楚一些!
一些杂七杂八的链接
https://andrewmatveychuk.com/how-to-sign-you-commits-with-gpg-git-and-yubikey/
https://den.dev/blog/signing-github-commits-yubikey/
还有这个最全的yubikey的命令集: https://github.com/drduh/YubiKey-Guide
这篇文章也不错的 https://www.engineerbetter.com/blog/yubikey-signed-commits/
https://medium.com/@antagonist/sign-your-git-commits-using-your-yubikey-gpg-8118fef12ee5
以上是我看过的基本上所有的文章,有好有坏,好的我都用中文额外说了一下。
下面是 youtube 视频
跟随这个视频你能实现 verified,但是无法正常实现最终目的——使用 yubikey 签名 commit。
https://www.youtube.com/watch?v=Y3mLBTCiccs&t=5s
正式开始啦
你需要具备的东西
一台 macOS 的电脑 一个 yubikey 一个 GitHub 账号 拥有基本的计算机素养
那么首先你需要注意的你是什么系统,这边我拿我的 macOS 来做演示哈。
开始流程
安装基本软件
macOS 需要安装 Yubikey manager 和 GnuPG 以及 Pinentry
YubiKey Manager
- Download the latest version directly from https://www.yubico.com/
GnuPG
The easiest way to install GnuPG on macOS is using Homebrew:
Note: The latest version of GnuPG (3.2.1 at the time of writing) on Homebrew works fine.
$ brew install gnupg
Pinentry
It’s recommended to install the graphical pinentry program for macOS.
$ brew install pinentry-mac
Add to your ~/.gnupg/gpg-agent.conf file(这边需要注意的是,是在文件里添加下面一行,不是傻乎乎的在终端一直输入下面的东西):
pinentry-program /usr/local/bin/pinentry-mac
Add to your ~/.gnupg/scdaemon.conf file:
disable-ccid (From the man page: Disable the integrated support for CCID compliant readers. This allows falling back to one of the other drivers even if the internal CCID driver can handle the reader.)
生成密钥
生成之前先更改密钥的加解密算法
Changing to better defaults
We want to make sure we’re using the strongest key types that are available for GPG. For our purposes, we need to use RSA keys for all key types. Set the key size to the maximum supported by the YubiKey (4096 bits).
gpg/card> key-attr
Changing card key attribute for: Signature key
Please select what kind of key you want:
   (1) RSA
   (2) ECC
Your selection? 1
What keysize do you want? (2048) 4096
The card will now be re-configured to generate a key of 4096 bits
Changing card key attribute for: Encryption key
Please select what kind of key you want:
   (1) RSA
   (2) ECC
Your selection? 1
What keysize do you want? (2048) 4096
The card will now be re-configured to generate a key of 4096 bits
Changing card key attribute for: Authentication key
Please select what kind of key you want:
   (1) RSA
   (2) ECC
Your selection? 1
What keysize do you want? (2048) 4096
The card will now be re-configured to generate a key of 4096 bits
开始生成密钥
命令如下
gpg --card-edit
然后你将进入到 yubikey 的配置程序
gpg/card> admin
Admin commands are allowed
你可以选择设置 yubikey 的 PIN 和 Admin PIN
gpg/card> passwd
gpg: OpenPGP card no. D2760001240102010006078005150000 detected

1 - change PIN
2 - unblock PIN
3 - change Admin PIN
4 - set the Reset Code
Q - quit

Your selection? 1
<< Enter PIN. (Default is 123456) >>
PIN changed.

1 - change PIN
2 - unblock PIN
3 - change Admin PIN
4 - set the Reset Code
Q - quit

Your selection? 3
<< Enter admin PIN. (Default is 12345678) >>

1 - change PIN
2 - unblock PIN
3 - change Admin PIN
4 - set the Reset Code
Q - quit

Your selection? Q
然后生成你的 gpg 混合加密系统的三个加密密钥
gpg/card> generate
Make off-card backup of encryption key? (Y/n) n

Please note that the factory settings of the PINs are
   PIN = '123456'     Admin PIN = '12345678'
You should change them using the command --change-pin

Please specify how long the key should be valid.
         0 = key does not expire
      <n>  = key expires in n days
      <n>w = key expires in n weeks
      <n>m = key expires in n months
      <n>y = key expires in n years
Key is valid for? (0)
Key does not expire at all
Is this correct? (y/N) y

GnuPG needs to construct a user ID to identify your key.

Real name: You
Name must be at least 5 characters long
Real name: You McEngineer
Email address: you@example.com
Comment:
You selected this USER-ID:
    "You McEngineer <you@example.com>"

Change (N)ame, (C)omment, (E)mail or (O)kay/(Q)uit? O
gpg: key 109F2428DD97A597 marked as ultimately trusted
gpg: revocation certificate stored as 'C:/Users/you/AppData/Roaming/gnupg/openpgp-revocs.d\2F28DCB202028A5A2FE5A45D109F2428DD97A597.rev'
public and secret key created and signed.
list 命令列出所有的 密钥
gpg/card> list

Reader ...........: Yubico YubiKey OTP CCID 0
Application ID ...: D2760001240103030006000152110000
Version ..........: 3.3
Manufacturer .....: Yubico
Serial number ....: 00015211
Name of cardholder: [not set]
Language prefs ...: [not set]
Sex ..............: unspecified
URL of public key : [not set]
Login data .......: [not set]
Signature PIN ....: not forced
Key attributes ...: rsa4096 rsa4096 rsa4096
Max. PIN lengths .: 127 127 127
PIN retry counter : 3 3 3
Signature counter : 4
KDF setting ......: on
Signature key ....: 2F28 DCB2 0202 8A5A 2FE5  A45D 109F 2428 DD97 A597
      created ....: 2019-12-03 01:21:36
Encryption key....: 4E14 0FFF B296 D2D5 6CD0  A654 C821 9CCE 0DAB FC09
      created ....: 2019-12-03 01:21:36
Authentication key: 529E FBFD BF0C 5908 79A5  4FAB 23DC 6210 FD32 B9BF
      created ....: 2019-12-03 01:21:36
General key info..:
pub  rsa4096/109F2428DD97A597 2019-12-03 You McEngineer <you@example.com>
sec>  rsa4096/109F2428DD97A597  created: 2019-12-03  expires: never
                                card-no: 0006 00015211
ssb>  rsa4096/23DC6210FD32B9BF  created: 2019-12-03  expires: never
                                card-no: 0006 00015211
ssb>  rsa4096/C8219CCE0DABFC09  created: 2019-12-03  expires: never
                                card-no: 0006 00015211
导出你的 gpg 公钥,放在 GitHub,得让 GitHub 以后验证你的 commit 呀
gpg --armor --output you_pub.asc --export you@example.com
添加到 GitHub 就不多讲啦,跟 添加 ssh 密钥到 GitHub 是一样的。
设置 git commit (以后可以设置 tags)
查看密钥
> gpg --list-secret-keys --keyid-format LONG <youremail@example.com>

C:/Users/youruser/AppData/Roaming/gnupg/pubring.kbx
-----------------------------------------------
sec>  rsa4096/36264D8005D951D8 2019-06-19 [SC]
      12341C42734692704224266256EDCD8005D9ABD3
      Card serial no. = 0006 12345678
uid                 [ultimate] Employee <employee@example.com>
ssb>  rsa4096/B4E1273375AC2412 2019-06-19 [S] [expires: 2021-06-18]
ssb>  rsa4096/2B5F29BB2DCA942D 2019-06-19 [E] [expires: 2021-06-18]
ssb>  rsa4096/AC59547D0CCB5ACE 2019-06-19 [A] [expires: 2021-06-18]
配置 git
git config --global user.signingKey B4E1273375AC2412
为了避免以后每次 commit 都带有 -S ,可以这样配置
git config --global commit.gpgsign true
不过根据我的日常使用经验,每次隔一段时间,比如我隔一晚上,然后起来准备提交的时候。是需要先执行这个命令,然后输入 yubikey 的基本密码, 接下来所有的 commit 才是被 gpg
verified的状态!!!
为 macOS 添加制定的 GPG 执行程序
git config --global gpg.program gpg
给 commits 签名
输入下面的命令
git commit -S -m 'Fixed a small undocumented feature that made foo crash'
展示你上次签名过的 commit
git cat-file -p HEAD
tree c09dec94a1b2f8c4792fd0faef35623e0463fc73
parent 3fe8b3b4b9394678aeadfa4113e8982802f759f8
author Committer Name <committer@example.com> 1393232400 +0200
gpgsig -----BEGIN PGP SIGNATURE-----
 Version: GnuPG v1

iQEcBAABCAAGBQJW/PEoAAoJEJDLBFvTmUcBo58H/1hb+uhqVCRRFnQDJ7gHM+v1
6vgWxtaEpf86foJe+V/8r2dij2fKAPcbMQbeakfO0PplSRUY6+XnvXY+2uFHs2TB
BxsAz1HYLnl6jXRKpLqduqJLmnwnkwaMCr1Bx/rZ1CWAsKtwBf4AGpW7ws9Dv6zh
Y7EPcVeO4dvftTqCsoOu6ZBmw9U24DA5XCl7ZG2nDiW9spS8CTlznGA3/LJ56mWF
Rm+xaJbfFwr2KS5wdyZkzdEh0sIcbmAYVhnKkj4HiBegrK+wCcayOfc0YMzOUPL9
uJ4pB32g0jLJbpNHRXqhQ/OU9eCRG3B55UBpimvLOLok3si6d/fYd3zTmB9bJaE=
=Bh19
-----END PGP SIGNATURE-----
验证你的 commits
命令显示你的 commit
$ git show HEAD --show-signature

commit 552b36ec86790bfdac679ab23e6d61133ff0b383
gpg: Signature made Sat 22 Feb 2014 11:00:00 CEST using RSA key ID AABBCCDD
gpg: Good signature from "Committer Name <committer@example.com>"
Author: Committer Name <committer@example.com>
Date:   Sat Feb 22 11:00:00 2014 +0200

    Fixed a small undocumented feature that made foo crash
GPG必须拥有签名者的公钥才能成功验证签名。
前面的命令假设感兴趣的提交是最后一次。要验证一个普通的提交,请将 HEAD 替换为提交 ID(本例中为 552b36ec86790bfdac679ab23e6d61133ff0b383)。
验证提交签名的替代命令是
git log --show-signature # Displays all commits and verify signed ones
git verify-commit HEAD # Displays and verify the latest commit
Conclusion
大概到现在,我们就已经全部完成了。就是这样!